Amazon EC2 instances provide great resources when it comes to managing servers and running your applications on the web. With the ever-growing capability, AWS offers various options to run our servers online. But, how do we ensure that we take the best approach to keep the servers up to date without worrying about security?
Connection from third party platforms to AWS can be done in multiple ways. The usual go is to create IAM users and limit the scope to the least IAM privileges. But what if I say we no longer need any long-term credentials to authenticate with AWS from GitHub?
You heard it right! With the underlying concept of IAM anywhere, third-party providers can now use OpenID Connect to establish a secure connection from their platform to AWS.
In this article, we will learn how to set up a CI/CD pipeline that can help you deploy your source code changes to EC2 using GitHub Actions.
The following flow diagram gives a quick insight into our approach for this setup.
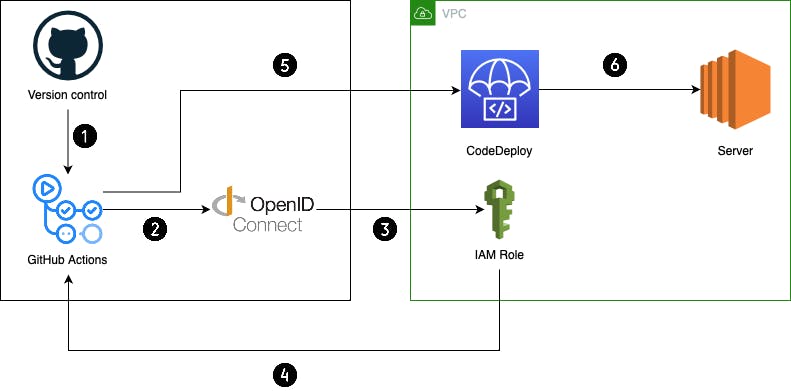
Here's a brief walkthrough of these components:
GitHub is used as the version control system. We will be using it to store the server code and other required scripts for using CodeDeploy.
GitHub Actions is used to run the workflow which will authenticate with Amazon Web Services (AWS) and create a new deployment in CodeDeploy.
OpenID Connect (OIDC) is an authentication protocol that helps to securely authenticate between applications.
CodeDeploy is an AWS managed deployment service that helps to automate your deployment lifecycle to EC2, ECS, Lambda, and on-premises servers.
We will be using CodeDeploy to deploy our server code changes to EC2.
EC2 is a compute platform that could be used for multiple purposes. Here, we are using it to run a node.js server.
GitHub links
Follow the project here for creating the necessary AWS infrastructure for this project, developed using CDK.
Find the link to set up the GitHub Actions workflow and CodeDeploy scripts for deploying to EC2 here.
How does OpenID Connect work?
Read this well-written article by GitHub to understand how the concept works.
CDK for GitHub OpenID Connect
Now let's go through the CDK code to create the IAM infrastructure for OpenID Connect and the necessary permissions to carry out a deployment to EC2.
We will first create the GitHub Identity Provider (IdP) in AWS that will allow us to use GitHub as a Web Identity while creating an IAM role.
CDK allows us to create the GitHub IdP using the iam.OpenIdConnectProvider construct with GitHub Provider's URL and audience.
 // GitHub IdP
    const githubProvider = new iam.OpenIdConnectProvider(this, 'GitHubProvider', {
      url: 'https://token.actions.githubusercontent.com',
      clientIds: ['sts.amazonaws.com'],
      thumbprints: ['6938fd4d98bab03faadb97b34396831e3780aea1'], // https://github.blog/changelog/2022-01-13-github-actions-update-on-oidc-based-deployments-to-aws/
    });

    // IAM Role for github actions
    const githubRole = new iam.Role(this, 'GitHubRole', {
      roleName: 'githubactions-ec2-codedeploy-role',
      assumedBy: new iam.OpenIdConnectPrincipal(githubProvider).withConditions(
        {
          "StringLike": {
            "token.actions.githubusercontent.com:sub": `${githubRepoPath}`
          },
          "StringEquals": {
            "token.actions.githubusercontent.com:aud": "sts.amazonaws.com"
          }
        }
      )
    });
As a best practice, it's recommended to limit access to the particular repository from which you want to access this IAM role. You can pass the GitHub repository URL as a prop - repo:{path-to-your-repository-without-https://}:* using ${githubRepoPath} variable from the bin file.
Awesome! Now that the IAM role is ready, let's add the necessary permissions to create an EC2 deployment to the role using a policy.
    // IAM Policy for github actions
    githubRole.addToPolicy(new iam.PolicyStatement({
      actions: [
        'codedeploy:CreateDeployment',
        'codedeploy:GetApplication',
        'codedeploy:GetApplicationRevision',
        'codedeploy:GetDeployment',
        'codedeploy:GetDeploymentConfig',
        'codedeploy:RegisterApplicationRevision',
      ],
      resources: ['*'],
    }));
Wonderful! Now we have OpenID Connect ready. Copy this role ARN so that we can use it in our workflow.
Setting up CodeDeploy
CodeDeploy helps us to carry out deployments to EC2 and also to run any script post-deployment. For example, a script to install node dependencies and start your server.
Let's first create the IAM role for CodeDeploy which allows it to perform any necessary action onto EC2.
// IAM Role for CodeDeploy
    const codedeployRole = new iam.Role(this, 'CodeDeployRole', {
      roleName: 'ec2-codedeploy-role',
      assumedBy: new iam.ServicePrincipal('codedeploy.amazonaws.com'),
      managedPolicies: [
        iam.ManagedPolicy.fromAwsManagedPolicyName('service-role/AWSCodeDeployRole'),
      ],
    });
Now, let's create the CodeDeploy application and Deployment Group.
    // CodeDeploy for EC2
    const ec2CodeDeploy = new codedeploy.ServerApplication(this, 'EC2CodeDeploy', {
      applicationName: 'ec2-codedeploy',
    });

    // CodeDeploy Deployment Group
    const deploymentGroup = new codedeploy.ServerDeploymentGroup(this, 'EC2DeploymentGroup', {
      application: ec2CodeDeploy,
      deploymentGroupName: 'ec2-codedeploy-deployment-group',
      role: codedeployRole,
      deploymentConfig: codedeploy.ServerDeploymentConfig.ALL_AT_ONCE,
      installAgent: true,
      ec2InstanceTags: new codedeploy.InstanceTagSet({
        'Name': ['S2'], // Name of your EC2 instance
      }),
    });
Note that you can pass the instance tag to the deployment group so that CodeDeploy identifies which instance to deploy to.
Setting up EC2 for CodeDeploy
Great! Now that we've set up OpenID Connect and CodeDeploy, let's make sure that our EC2 instance is ready to accept new deployments.
First, make sure that your EC2 instance has an IAM role attached that allows it to download code revisions from S3 bucket.
Go to the EC2 dashboard, click on your instance, go to Instance state, Security, and Modify IAM role.
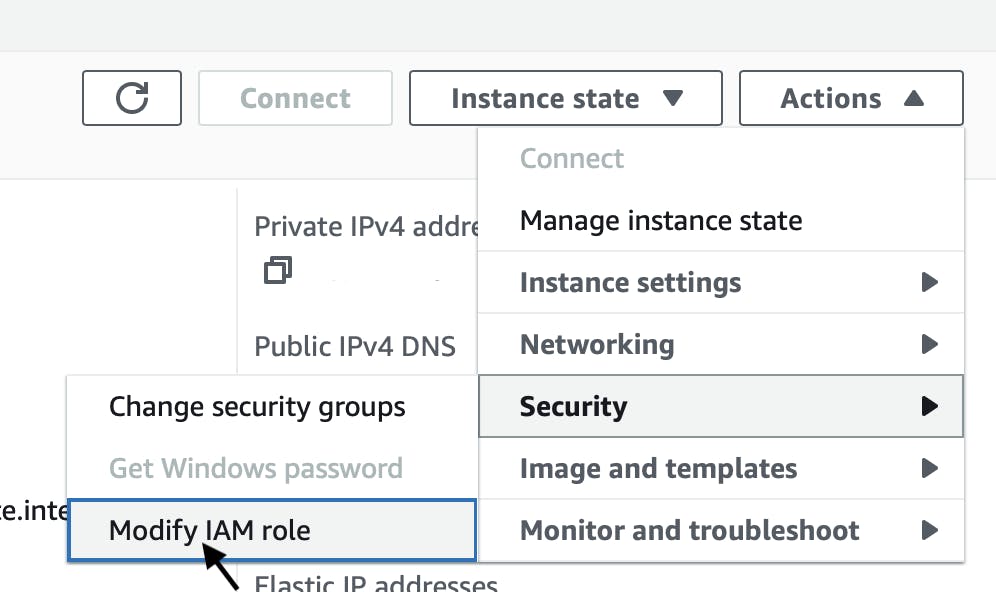
If you do not have a role attached, click on Create new IAM role.
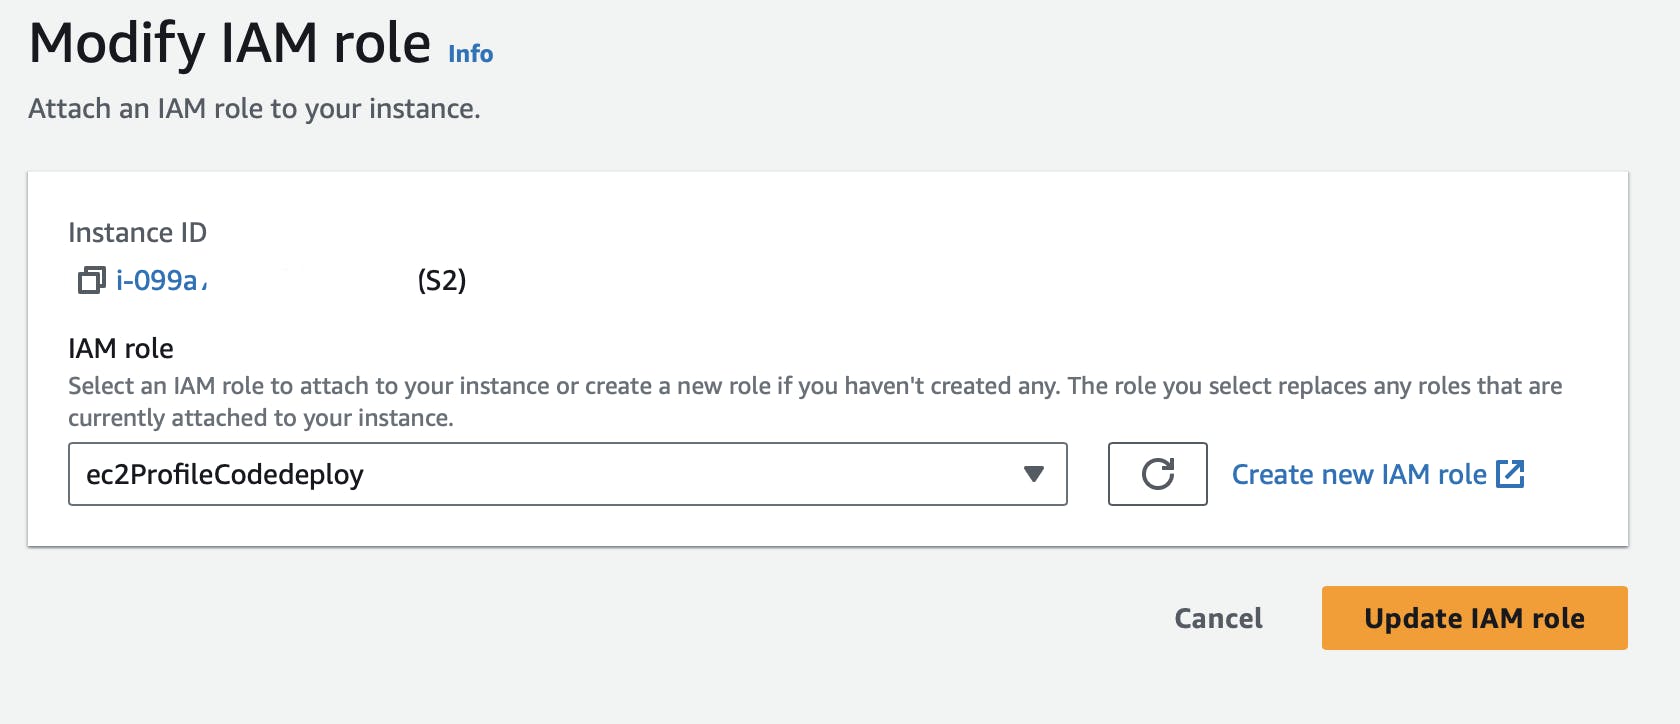
Create a new role with EC2 as the Use case.
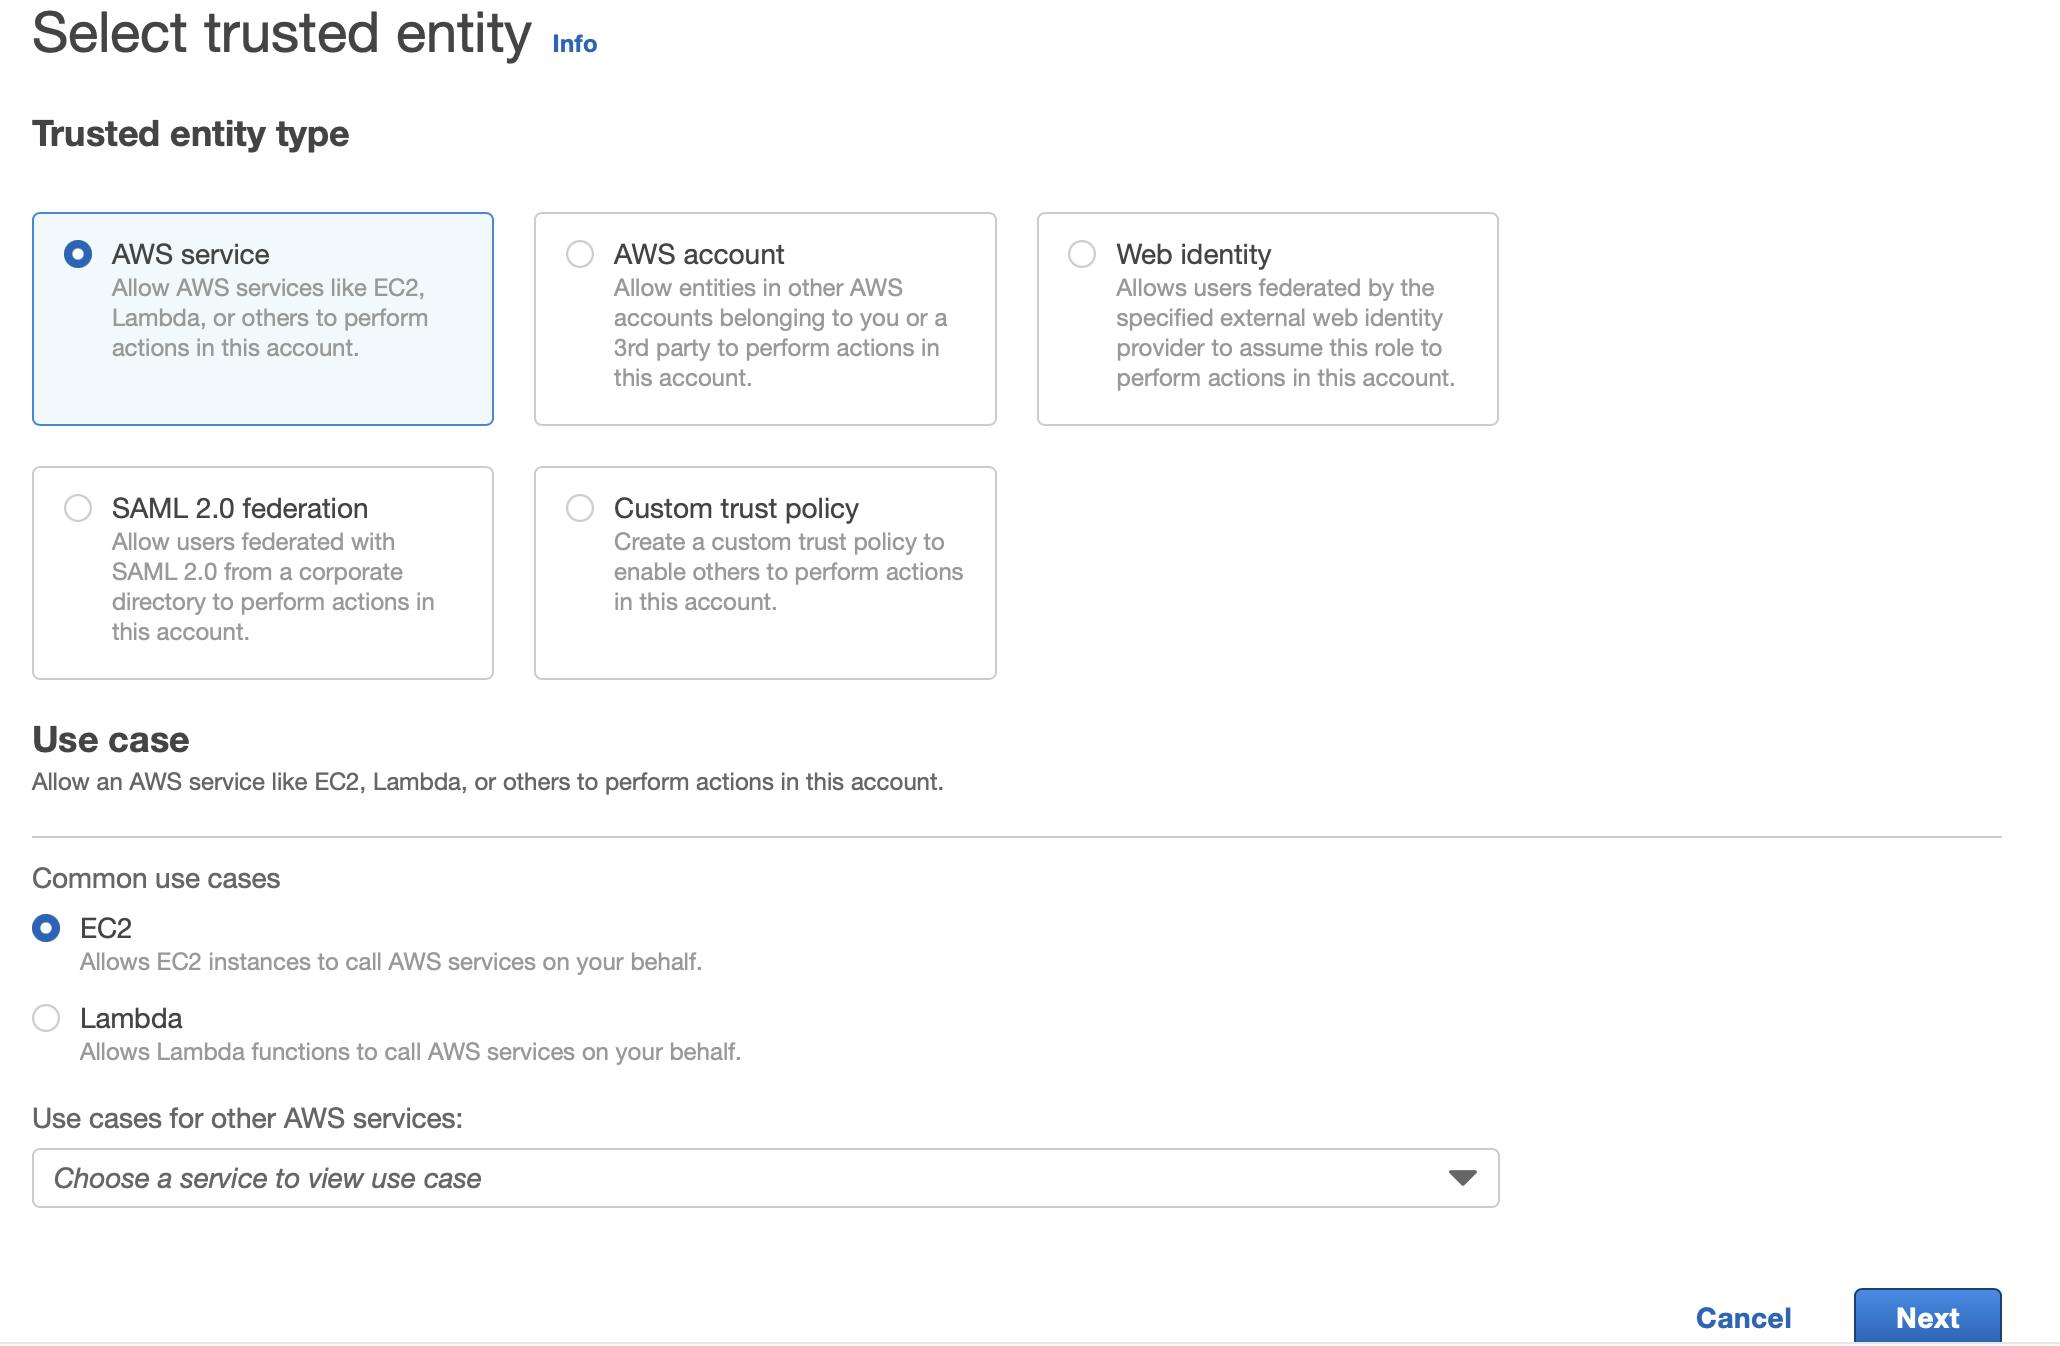
Choose
AmazonEC2RoleforAWSCodeDeployPolicy and click Next.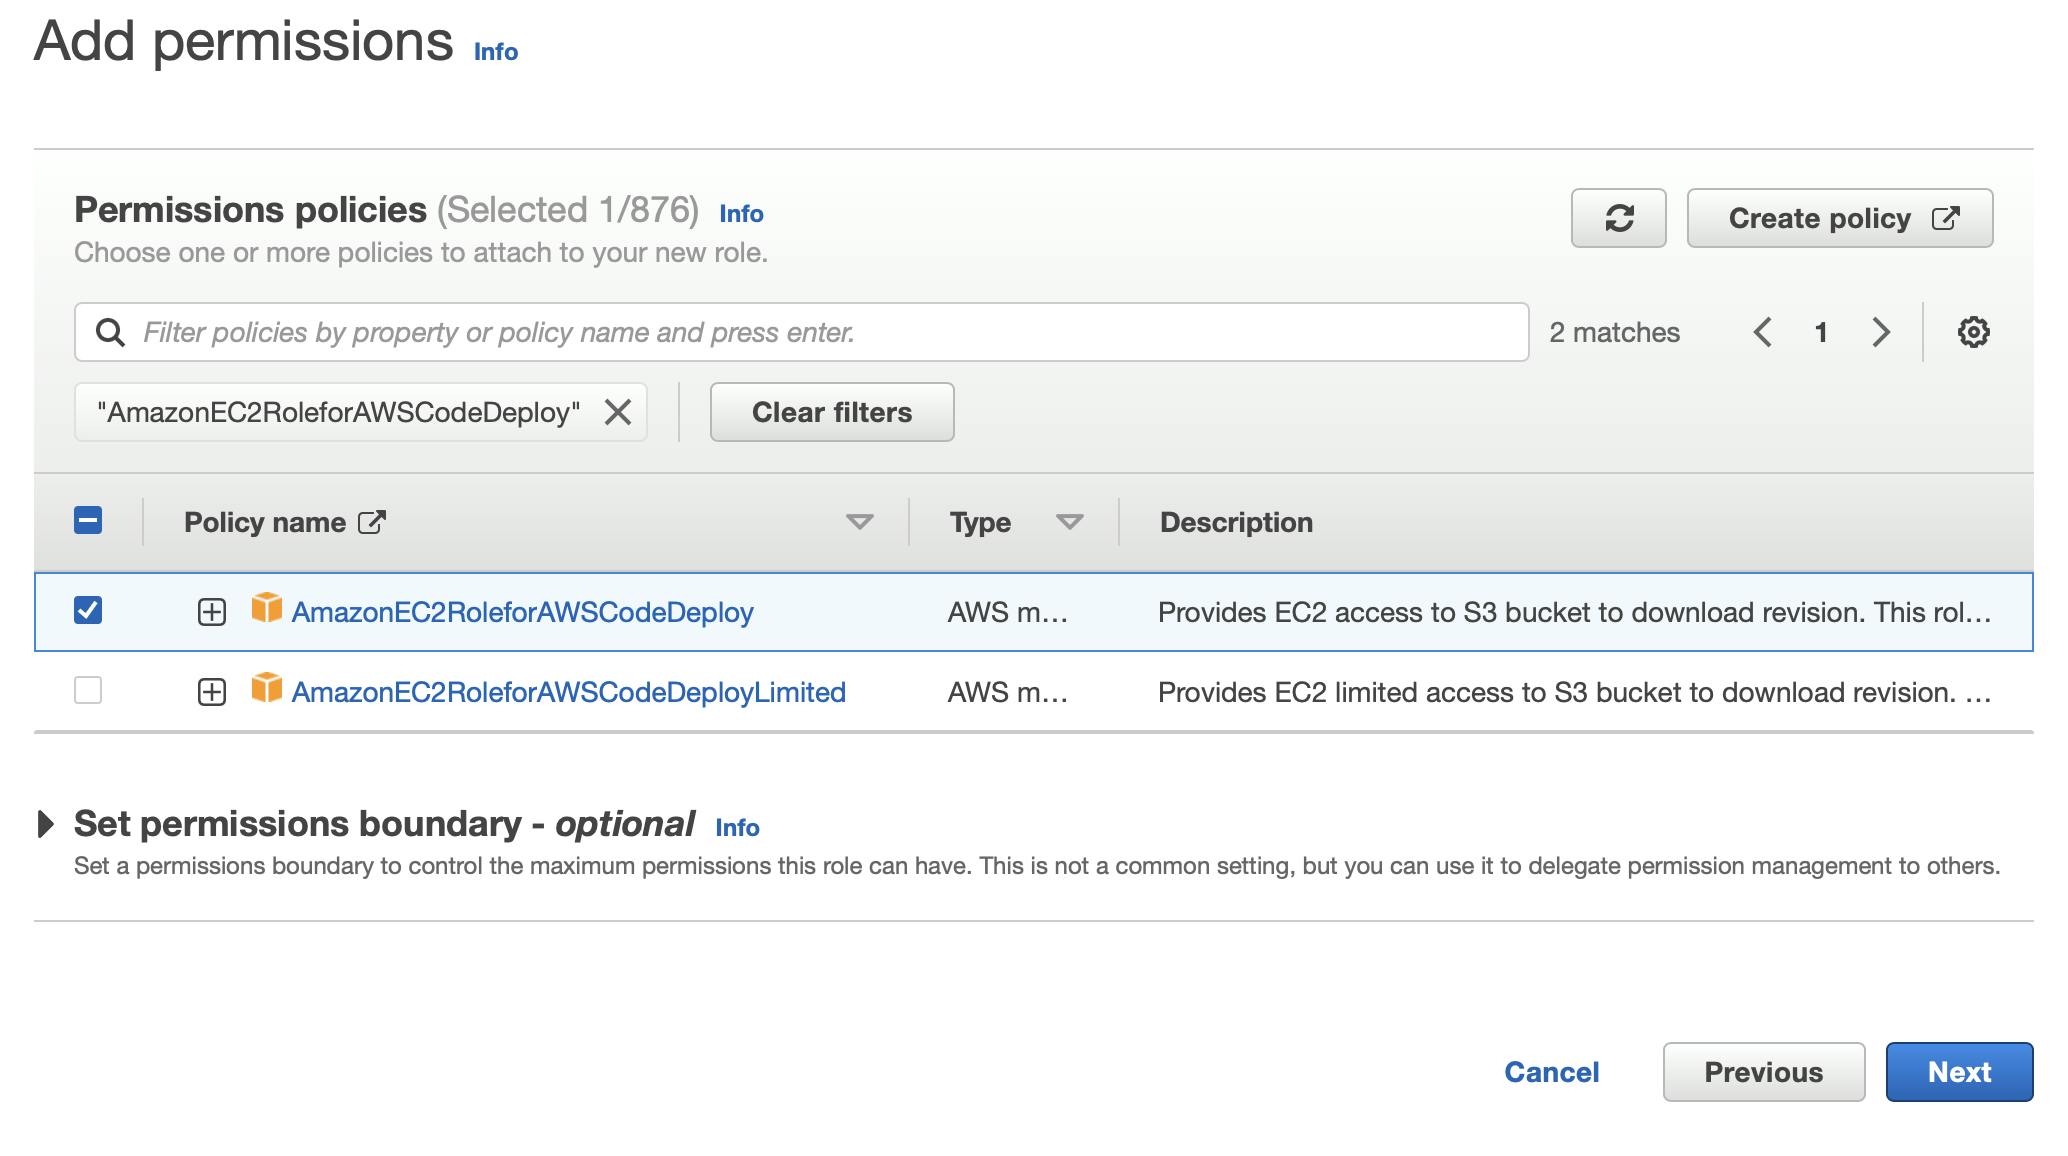
Name your IAM role and attach it to your EC2.
Next, make sure you have CodeDeploy Agent installed on your EC2 instance.
Follow the link here for more details.
Finally, install Node.js on your server. Follow the tutorial here.
Setting up workflow and CodeDeploy appspec.yml
Great job! All the infrastructure setup is now ready in AWS. Let's move ahead and start creating our workflow.
We will use the aws-actions/configure-aws-credentials@v2 image to securely authenticate with AWS using an IAM role and create a new deployment.
name: Deploy to EC2

on:
  push:
    branches: [ main ]

jobs:
  Deploy:
    runs-on: ubuntu-latest
    permissions:
      id-token: write
      contents: read

    steps:
    - name: Checkout
      uses: actions/checkout@v3

    - name: Configure AWS Credentials for GitHub Actions
      uses: aws-actions/configure-aws-credentials@v2
      with:
        role-to-assume: ${{ secrets.IAM_ROLE }}
        aws-region: ${{ secrets.AWS_REGION }}
    - run: |
        commit_hash=`git rev-parse HEAD`
        aws deploy create-deployment --application-name ${{ secrets.APPLICATION_NAME }} --deployment-group-name ${{ SECRETS.DG }} --revision revisionType=GitHub --github-location repository=$GITHUB_REPOSITORY,commitId=$commit_hash --ignore-application-stop-failures
Make sure to create GitHub secrets for the IAM role, AWS region, CodeDeploy application name, and Deployment group under your repository settings.
Next, let's create the appspec.yml file which directs CodeDeploy on what to do when the deployment happens.
version: 0.0
os: linux
files:
  - source: /
    destination: /home/ec2-user/server
hooks:
  ApplicationStop:
    - location: scripts/stop_server.sh
      timeout: 300
      runas: root
  ApplicationStart:
    - location: scripts/start_server.sh
      timeout: 300
      runas: root
Now, let's create the script to stop the application running on the server.
#!/bin/bash
export NVM_DIR="$HOME/.nvm"
[ -s "$NVM_DIR/nvm.sh" ] && \. "$NVM_DIR/nvm.sh"  # This loads nvm
[ -s "$NVM_DIR/bash_completion" ] && \. "$NVM_DIR/bash_completion"  # This loads nvm bash_completion
pm2_list=$(pm2 list)
if [ -n "$pm2_list" ]; then
    pm2 delete all
    echo "All servers have been deleted."
else
    echo "PM2 list is empty. No servers to delete."
fi
Finally, let's add the script to start the application after the deployment happens.
#!/bin/bash
cd /home/ec2-user/server
curl -o- https://raw.githubusercontent.com/nvm-sh/nvm/v0.39.3/install.sh | bash
. ~/.nvm/nvm.sh
export NVM_DIR="$HOME/.nvm"
[ -s "$NVM_DIR/nvm.sh" ] && \. "$NVM_DIR/nvm.sh"  # This loads nvm
[ -s "$NVM_DIR/bash_completion" ] && \. "$NVM_DIR/bash_completion"  # This loads nvm bash_completion
nvm install 16
npm install pm2@latest -g
pm2_list=$(pm2 list)
if [ -n "$pm2_list" ]; then
    pm2 delete all
    echo "All servers have been deleted."
else
    echo "PM2 list is empty. No servers to delete."
fi
# source /etc/profile.d/script.sh -> uncomment this to load any environment variables from the script.sh file
pm2 start index.js # change directory to the location of your server .js file to start your server
If you want to load any environment variables for your application, you can paste them onto the /etc/profile.d/script.sh file and load them by uncommenting the line mentioned in the start.sh script.
That's it! Any code changes pushed to GitHub repository will now trigger the workflow and update it onto the EC2 server.
Conclusion
This article guides you on using GitHub Actions to automate and manage workflows directly from GitHub.
To quickly summarize, the workflow will:
Authenticate with AWS using the IAM role created for OpenID Connect.
Create a new deployment in CodeDeploy specifying the GitHub commit ID.
CodeDeploy will then:
Install the CodeDeploy agent on the EC2 instance if needed.
Download the new code from GitHub.
Run the Application Stop script to stop any running processes.
Copy the new code to the EC2 instance.
Run the Application Start script to Install Node.js and PM2, unload any old PM2 processes, and start the Node.js application using PM2.
In short, any new commits to your GitHub repository will now automatically be deployed to the EC2 instance via CodeDeploy - without requiring long-lived AWS credentials.
Feel free to comment if you have any doubts in the article.
Follow me for more cloud and DevOps content.
See you in cloud!
Vishnu S.

